 |
!! Please select country!!
Created: 8 Oct 2007
|
Remove the cover above the passenger footwell below the glovebox, there are two TORX scews on the front edge, once removed the cover drops slightly and slides towards you. If you have the interior lights package you will have to unclip the light, or the power to the light as you remove the cover. If you have the CD changer installed, pull the bracket with the CD changer forward from the middle of the glovebox. You will have to reach round and release the power and fibre connectors. The picture below shows those connectors on the back of the CD changer bracket. The power connecor pulls out, the fibre one has a catch which you can see on the yellow dust cover plug on the left.
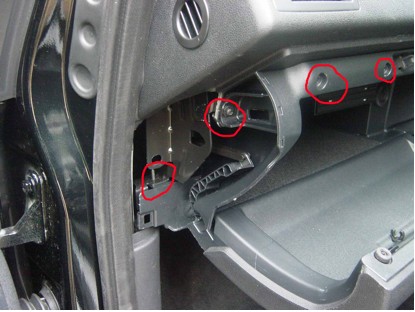
Remove the two TORX screws that hold the bottom of the glovebox that are now visible - you can see the top of part of one of them in the picture below (left most red highlghted area). Open the glovebox and remove the small panel with the airbag sticker on it that is normally hidden by the door. You will probably have to pull off the door frame seal around the area of the panel. Remove the TORX screw for the side of the glovebox (2nd from left in picture below) Remove the covers from the 4 torx screws along the top edge of the glovebox, and the 4 screws. Pull out glovebox, noting the pipework to the airvent for reassembly. Picture of glovebox from side with panel removed, showing some of the screws.
When you re-assemble it, dont forget to put the airvent pipe back correctly connect the footwell light back up.
|

If you found this information useful, please support the site by making a donation via Paypal. Any amount at all helps me improve the information on the site. |
Comand Online Ltd - the place to buy Mercedes iPod kits, phone kits, retrofit parts & map disks MY AUTOCAR - THE BEST PLACE TO TALK CARS |